<?xml version="1.0" encoding="utf-8"?><feed xmlns="http://www.w3.org/2005/Atom" ><generator uri="https://jekyllrb.com/" version="4.0.1">Jekyll</generator><link href="https://rajarv.com/feed.xml" rel="self" type="application/atom+xml" /><link href="https://rajarv.com/" rel="alternate" type="text/html" /><updated>2025-11-10T09:35:22+00:00</updated><id>https://rajarv.com/feed.xml</id><title type="html">Raja Vundela</title><subtitle>Web Development and Tech Blogs</subtitle><author><name>Raja Vundela</name></author><entry><title type="html">How to create a complete blog website and host for free</title><link href="https://rajarv.com/blog/create-deploy-free-blog/" rel="alternate" type="text/html" title="How to create a complete blog website and host for free" /><published>2023-11-09T00:00:00+00:00</published><updated>2023-12-26T00:00:00+00:00</updated><id>https://rajarv.com/blog/create-deploy-free-blog</id><content type="html" xml:base="https://rajarv.com/blog/create-deploy-free-blog/"><![CDATA[<p>In this post, we go through on how to set up a blog/portofolio website with <a href="https://jekyllrb.com/">Jekyll</a> and host the website on <a href="https://www.netlify.com/">Netlify</a> for completely free. No coding required guys!</p>

<h2 id="introduction">Introduction</h2>

<p><a href="https://jekyllrb.com/">Jekyll</a> is a blog-aware static site generator written in Ruby which we use to build our website and we deploy our site to <a href="https://www.netlify.com/">Netlify</a>. Netlify is primarily used for serverless application hosting and they have a lot of add-ons like forms to hook up with our website later, free SSL certificate and DNS Server management and they also offer <strong>100GB free traffic per month</strong>😊. Some alternative hosting options to Netlify are <a href="https://azure.microsoft.com/en-ca/products/app-service/static">Azure Static Web App</a>, <a href="https://pages.github.com/">Github Pages</a> and others.
In this post, I’d be covering deployment to Neltify only.</p>

<p>Taking off a server and using a static website has huge benefits.</p>
<ul>
  <li>Don’t have to pay for a expensive server to host</li>
  <li>If there’s a need for dynamic content we can use Javascript and API’s to deliver content(JAMStack).</li>
  <li>Deploy our website to Content Delivery Networks(CDN) for super fast loading of pages and so on..</li>
</ul>

<h2 id="how-to-setup-our-website-with-jekyll">How to setup our website with Jekyll</h2>

<h3 id="install-jekyll-on-windowslinuxmac">Install Jekyll on Windows/Linux/Mac</h3>

<p>Follow the <a href="https://jekyllrb.com/docs/installation/">installion</a> instructions listed on Jekyll website to install Ruby languge on your desktop and install Jekyll, bundler as gems.</p>

<h3 id="initialize-the-project">Initialize the project</h3>

<p>Create a new Jekyll Site with the below command</p>
<div class="language-bash highlighter-rouge"><div class="highlight"><pre class="highlight"><code>jekyll new my-blog
</code></pre></div></div>
<p>cd into <code class="highlighter-rouge">my-blog</code></p>
<div class="language-bash highlighter-rouge"><div class="highlight"><pre class="highlight"><code><span class="nb">cd </span>my-blog
</code></pre></div></div>
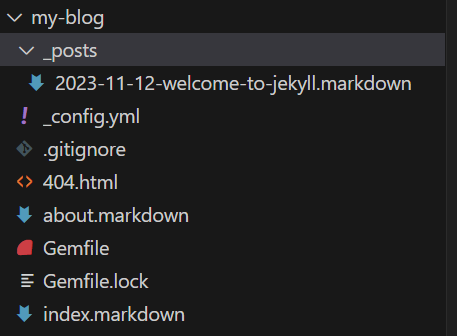
<p>You’ll see the default files and folders that <code class="highlighter-rouge">Jekyll new</code> command created inside <code class="highlighter-rouge">my-blog</code> folder.
<code class="highlighter-rouge">Jekyll new</code> command includes a simple starter blog site using <a href="https://github.com/jekyll/minima">Minima</a> theme.
<img src="https://rajarv.com/assets/images/uploads/2023-11-09-jekyll-new-folder-default-files.png" alt="Jekyll new folder cmd folder structure" /></p>

<p>To run and test the website on local server, run the below command and go to <a href="http://localhost:4000">http://localhost:4000</a> to see it live.</p>
<div class="language-bash highlighter-rouge"><div class="highlight"><pre class="highlight"><code>bundle <span class="nb">exec </span>jekyll serve
</code></pre></div></div>

<p class="notice--warning">If you see any <a href="https://github.com/jekyll/jekyll/issues/9427">Depreciation Warnings</a> in the terminal after running <code class="highlighter-rouge">bundle exec jekyll serve</code>, Don’t worry and please ignore them as it won’t affect our website.</p>

<!-- **Note:** For windows, run the command `bundle add webrick` in terminal to add webrick gem after initializing the project if the local server doesn't start and throws webrick error.
{: .notice--info} -->

<p class="notice--info">Also, Use Code Editor like <a href="https://code.visualstudio.com/">VS Code</a> as it makes our development flow very smooth with features like integrated Terminal and code highlighting and so on..</p>

<h3 id="use-theme-minimal-mistakes">Use theme Minimal Mistakes</h3>

<p>The easiest way to build our website is to use a <a href="https://github.com/topics/jekyll-theme">Jekyll theme</a> and <a href="https://github.com/mmistakes/minimal-mistakes">Minimal mistakes</a> theme has lot of documentation and customization options and I believe it fits all your blog needs. All you have to do is edit one file <code class="highlighter-rouge">_config.yml</code> to do most customizations for our website.</p>

<p>There are a couple ways to install the theme. But I’d recommend gem based installion as it is easy to update the theme in the future.</p>

<ol>
  <li>To add theme as a gem add below line at the end of <code class="highlighter-rouge">Gemfile</code>.
    <div class="language-ruby highlighter-rouge"><div class="highlight"><pre class="highlight"><code><span class="n">gem</span> <span class="s2">"minimal-mistakes-jekyll"</span>
</code></pre></div>    </div>
  </li>
  <li>To install Minimal Mistakes theme as gem and update existing gems, type below bundler command in
terminal.
    <div class="language-bash highlighter-rouge"><div class="highlight"><pre class="highlight"><code>bundle
</code></pre></div>    </div>
  </li>
  <li>Now, change the default theme from <code class="highlighter-rouge">minima</code> to <code class="highlighter-rouge">minimal-mistakes-jekyll</code>in <code class="highlighter-rouge">_config.yml</code> file to set your theme to Minimal Mistakes.
    <div class="language-yaml highlighter-rouge"><div class="highlight"><pre class="highlight"><code><span class="na">theme</span><span class="pi">:</span> <span class="s">minimal-mistakes-jekyll</span>
</code></pre></div>    </div>
  </li>
</ol>

<h3 id="setup-the-theme">Setup the theme</h3>

<ol>
  <li>Change the front matter of the home page in <code class="highlighter-rouge">index.markdown</code> to the following
    <div class="highlighter-rouge"><div class="highlight"><pre class="highlight"><code>---
layout: home
author_profile: true
---
</code></pre></div>    </div>
  </li>
  <li>Change the <code class="highlighter-rouge">layout: post</code> in <code class="highlighter-rouge">YYYY-MM-DD-welcome-to-jekyll.markdown</code> to <code class="highlighter-rouge">layout: single</code></li>
  <li>Remove <code class="highlighter-rouge">about.markdown</code></li>
</ol>

<p>Now, run the website with <code class="highlighter-rouge">bundle exec jekyll serve</code> and go to <a href="http://localhost:4000">http://localhost:4000</a> to check the changes.<br />
Press <code class="highlighter-rouge">Ctrl + C</code> to stop local server.</p>

<h3 id="customize-the-website">Customize the website</h3>

<p>Customize the website following the docs of theme especially visiting <a href="https://mmistakes.github.io/minimal-mistakes/docs/configuration/">Configuration</a>, working with <a href="https://mmistakes.github.io/minimal-mistakes/docs/posts/">posts</a> and <a href="https://mmistakes.github.io/minimal-mistakes/docs/pages/">pages</a> first.</p>

<!-- 
### Add a new post

Jekyll posts are written under `_posts` folder and file names for posts are written in the format `YYYY-MM-DD-file-name.md`. File name is used in the URL of the post. For example `https://website.com/YYYY/MM/DD/file-name`. We can later customize the `URL slug` for our liking. -->

<h2 id="deploy-site-to-netlify">Deploy site to Netlify.</h2>

<p>The best way to deploy is to connect Netlify to GitHub Repository instead of manually uploading site files to Netlify.</p>

<h3 id="create-a-git-repository-and-push-to-github">Create a git repository and push to GitHub</h3>

<ol>
  <li>Initialize the git repository
    <div class="language-bash highlighter-rouge"><div class="highlight"><pre class="highlight"><code>git init
</code></pre></div>    </div>
  </li>
  <li>Stage the current directory files to commit
    <div class="language-bash highlighter-rouge"><div class="highlight"><pre class="highlight"><code>git add <span class="nb">.</span>
</code></pre></div>    </div>
  </li>
  <li>Make your first commit in your local repository
    <div class="language-bash highlighter-rouge"><div class="highlight"><pre class="highlight"><code>git commit <span class="nt">-m</span> <span class="s2">"Initial commit"</span>
</code></pre></div>    </div>
  </li>
  <li>Now, Create a empty github repository. Go to <a href="https://github.com">Github</a>, click on <code class="highlighter-rouge">+</code> icon and create a new repository, give a repository name, For ex., <code class="highlighter-rouge">my-blog</code> and click on <code class="highlighter-rouge">Create repository</code></li>
  <li>Add the URL of the remote github repository to your local repository.
    <div class="language-bash highlighter-rouge"><div class="highlight"><pre class="highlight"><code>git remote add origin your_git_repository_URL
</code></pre></div>    </div>
  </li>
  <li>Push your local local repository code to Github.
    <div class="language-bash highlighter-rouge"><div class="highlight"><pre class="highlight"><code>git push <span class="nt">-u</span> origin master
</code></pre></div>    </div>
  </li>
</ol>

<h3 id="connect-github-and-netlify">Connect Github and Netlify</h3>

<ol>
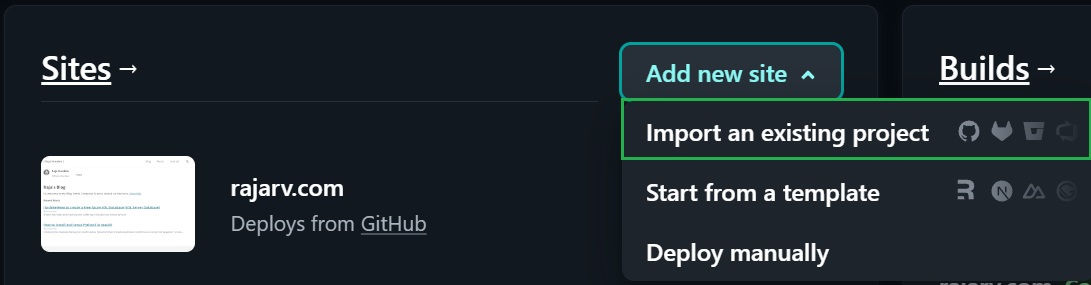
  <li>Go to <a href="https://app.netlify.com">Netlify</a> and sign up for an account. Create a new team with a name. Now, click on <code class="highlighter-rouge">Import an existing project</code> under <code class="highlighter-rouge">Add new site</code>.
<img src="https://rajarv.com/assets/images/uploads/2023-11-09-add-new-site.jpg" alt="Add new site" /></li>
  <li>
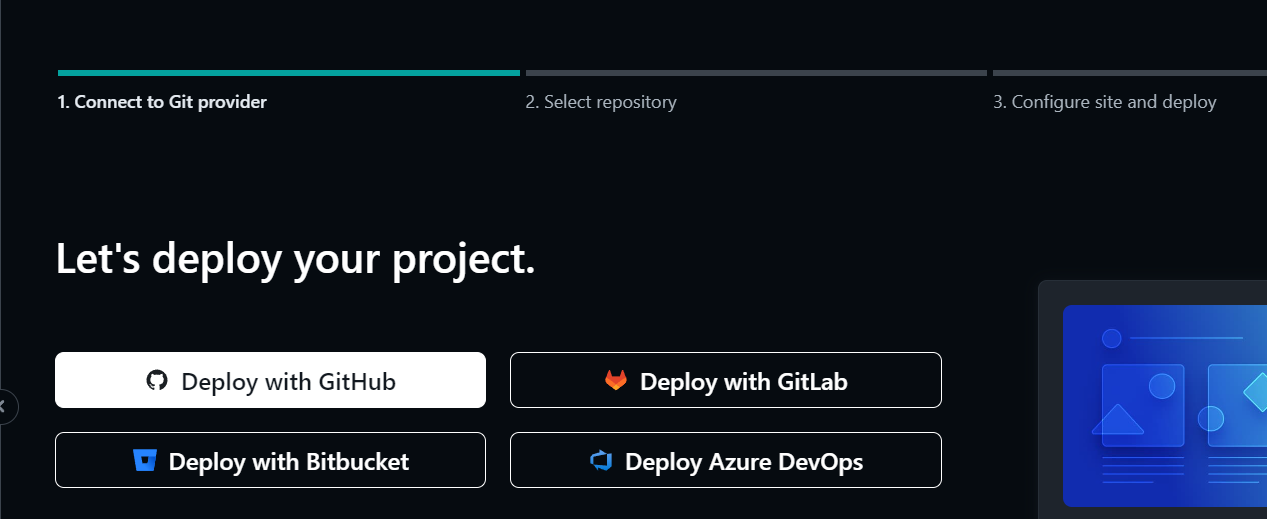
    <p>Now select, <code class="highlighter-rouge">Deploy with Github</code> and Authroize Netlify on next screen to connect to Github
<img src="https://rajarv.com/assets/images/uploads/2023-11-09-deploy-with-github.png" alt="Deploy with Github" /></p>
  </li>
  <li>
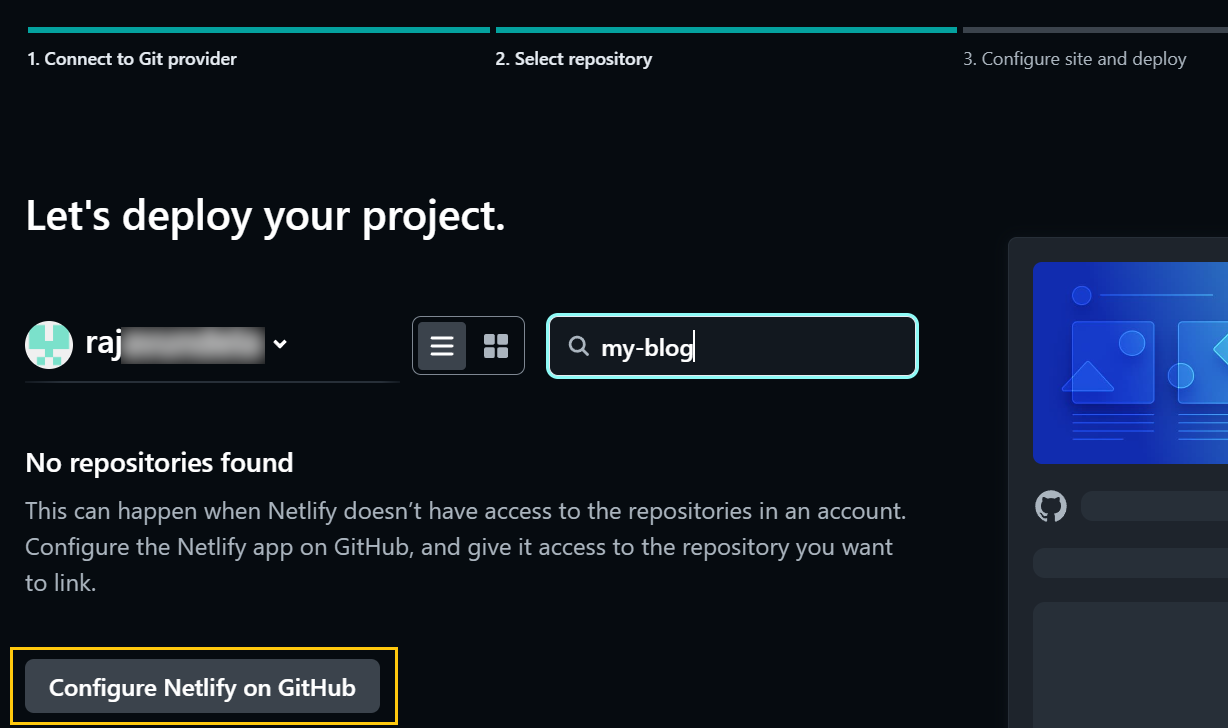
    <p>Search for your repository.If your repository won’t show up when you search, press <code class="highlighter-rouge">Configure Netlify On Github</code>.
<img src="https://rajarv.com/assets/images/uploads/2023-11-09-configure-netlify-on-github.png" alt="Configure Netlify on Github" /></p>
  </li>
  <li>
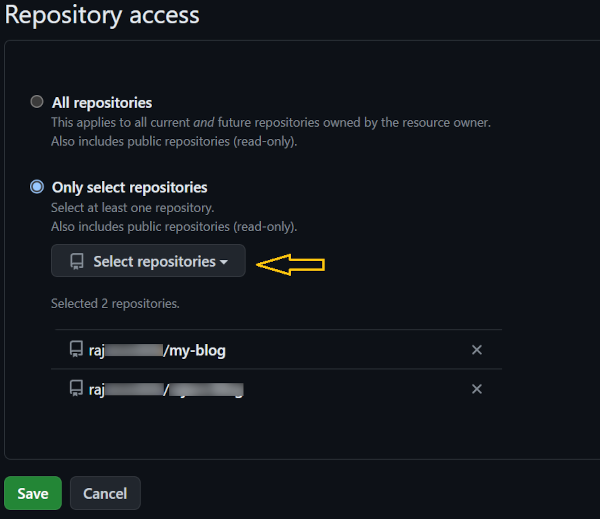
    <p>Scroll down on the pop-up window and add your specific repository from the dropdown or give access to all repositories and press <code class="highlighter-rouge">save</code>.
<img src="https://rajarv.com/assets/images/uploads/2023-11-09-give-repository-access.png" alt="Give repository access" /></p>
  </li>
  <li>
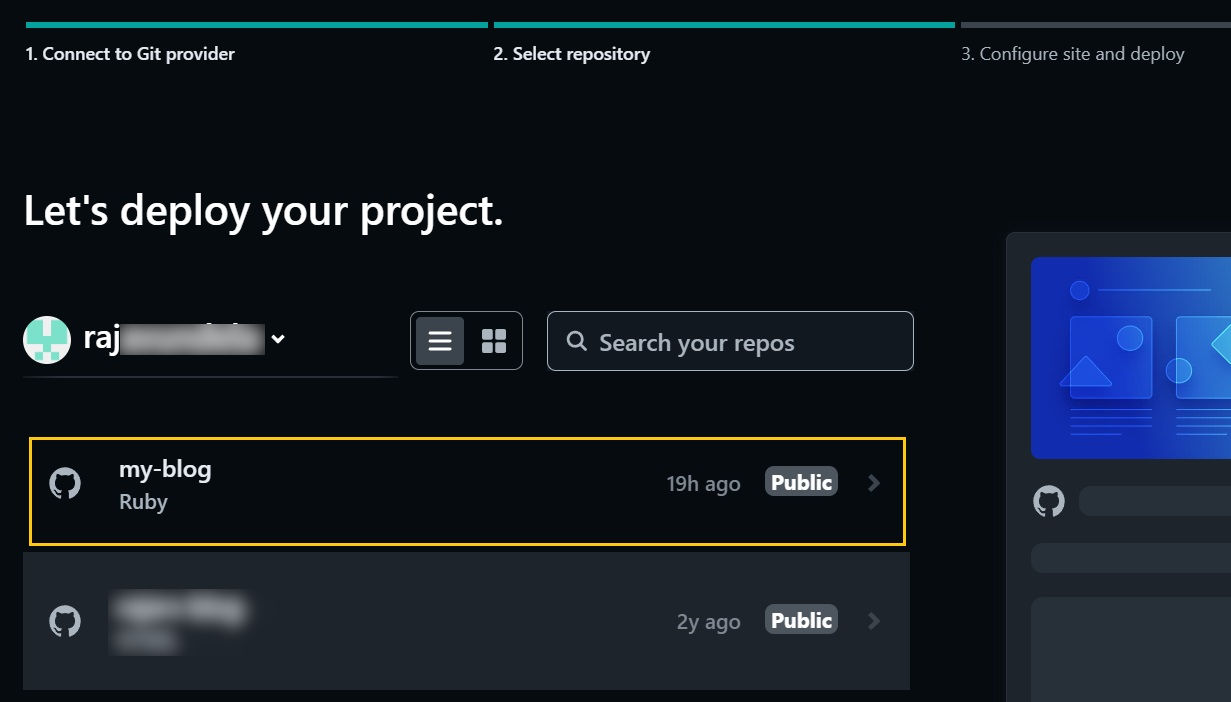
    <p>Now, you see your repository. Select it.
<img src="https://rajarv.com/assets/images/uploads/2023-11-09-select-your-repository.jpg" alt="Select your repository" /></p>
  </li>
  <li>
    <p>On the next page, we configure deployment settings for the website. The default options populated by Netlify are sufficient. Now, hit on that deploy button.</p>
  </li>
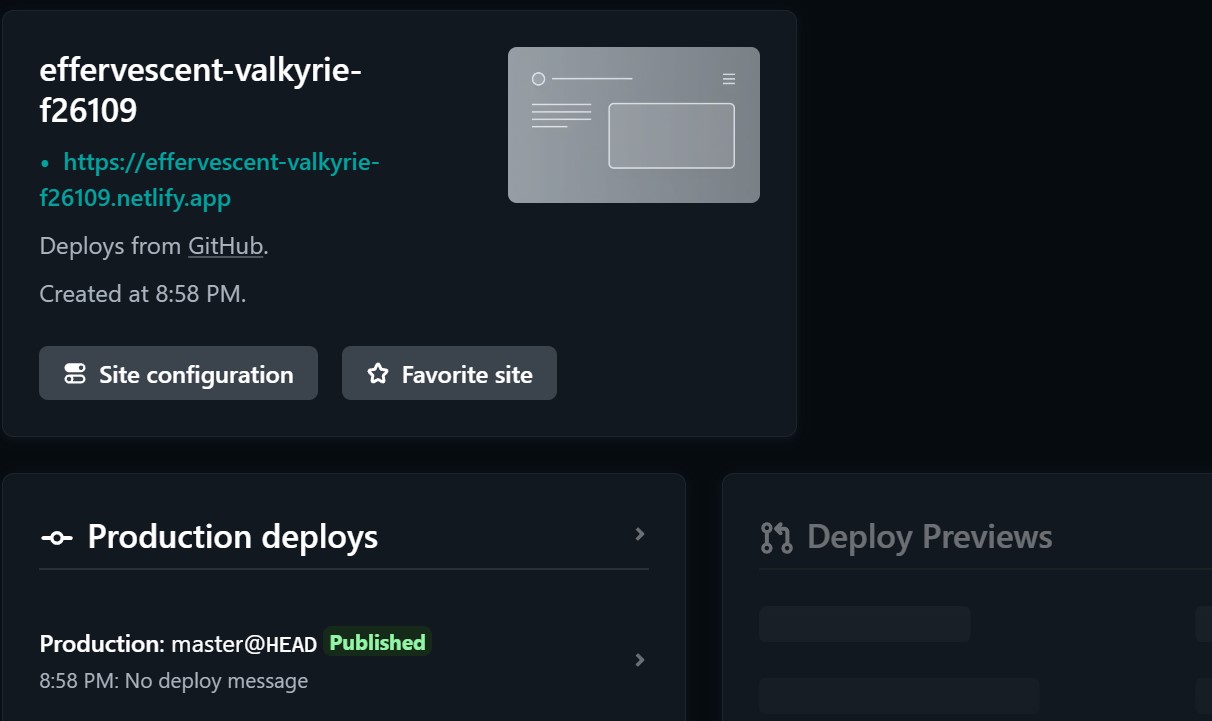
  <li>Our website is deployed to netlify sub-domain. Now, Setup a custom domain with Https.
<img src="https://rajarv.com/assets/images/uploads/2023-11-09-deployed.jpg" alt="Delpoyed" /></li>
</ol>

<p>Everytime you make changes on your website, like adding a new post or configuring a setting.
Commit your changes and push to github(see below commands).</p>
<div class="language-bash highlighter-rouge"><div class="highlight"><pre class="highlight"><code>git add <span class="nb">.</span>
git commit <span class="nt">-m</span> <span class="s2">"your-commit-message"</span>
git push
</code></pre></div></div>

<p class="notice--warning">For some reason, the changes to <code class="highlighter-rouge">_config.yml</code> won’t load automatically when using Minimal Mistakes and you have to stop and start local server to check your changes locally on the website.</p>

<p>Netlify will automatically deploy your new changes whenever there’s a change in Github repository.</p>

<p>Hope you enjoyed this post. If you have any comments/suggestions on this post or need help type them below, I’ll reply to every single one of them.</p>]]></content><author><name>Raja Vundela</name></author><category term="Blog" /><category term="Hosting" /><summary type="html"><![CDATA[In this post, we go through on how to set up a blog/portofolio website with Jekyll and host the website on Netlify for completely free. No coding required guys!]]></summary></entry><entry><title type="html">[Archive]How to create a Free Azure SQL Database (SQL Server Database)</title><link href="https://rajarv.com/blog/create-free-azure-sql-database/" rel="alternate" type="text/html" title="[Archive]How to create a Free Azure SQL Database (SQL Server Database)" /><published>2020-06-25T17:03:38+00:00</published><updated>2023-11-05T00:00:00+00:00</updated><id>https://rajarv.com/blog/create-free-azure-sql-database</id><content type="html" xml:base="https://rajarv.com/blog/create-free-azure-sql-database/"><![CDATA[<p class="notice--danger">Hi there, these steps doesn’t work anymore as <strong>Web App + SQL</strong> option was removed by Azure.</p>

<p>In this post, we go through on how to create a free Azure SQL Database.</p>

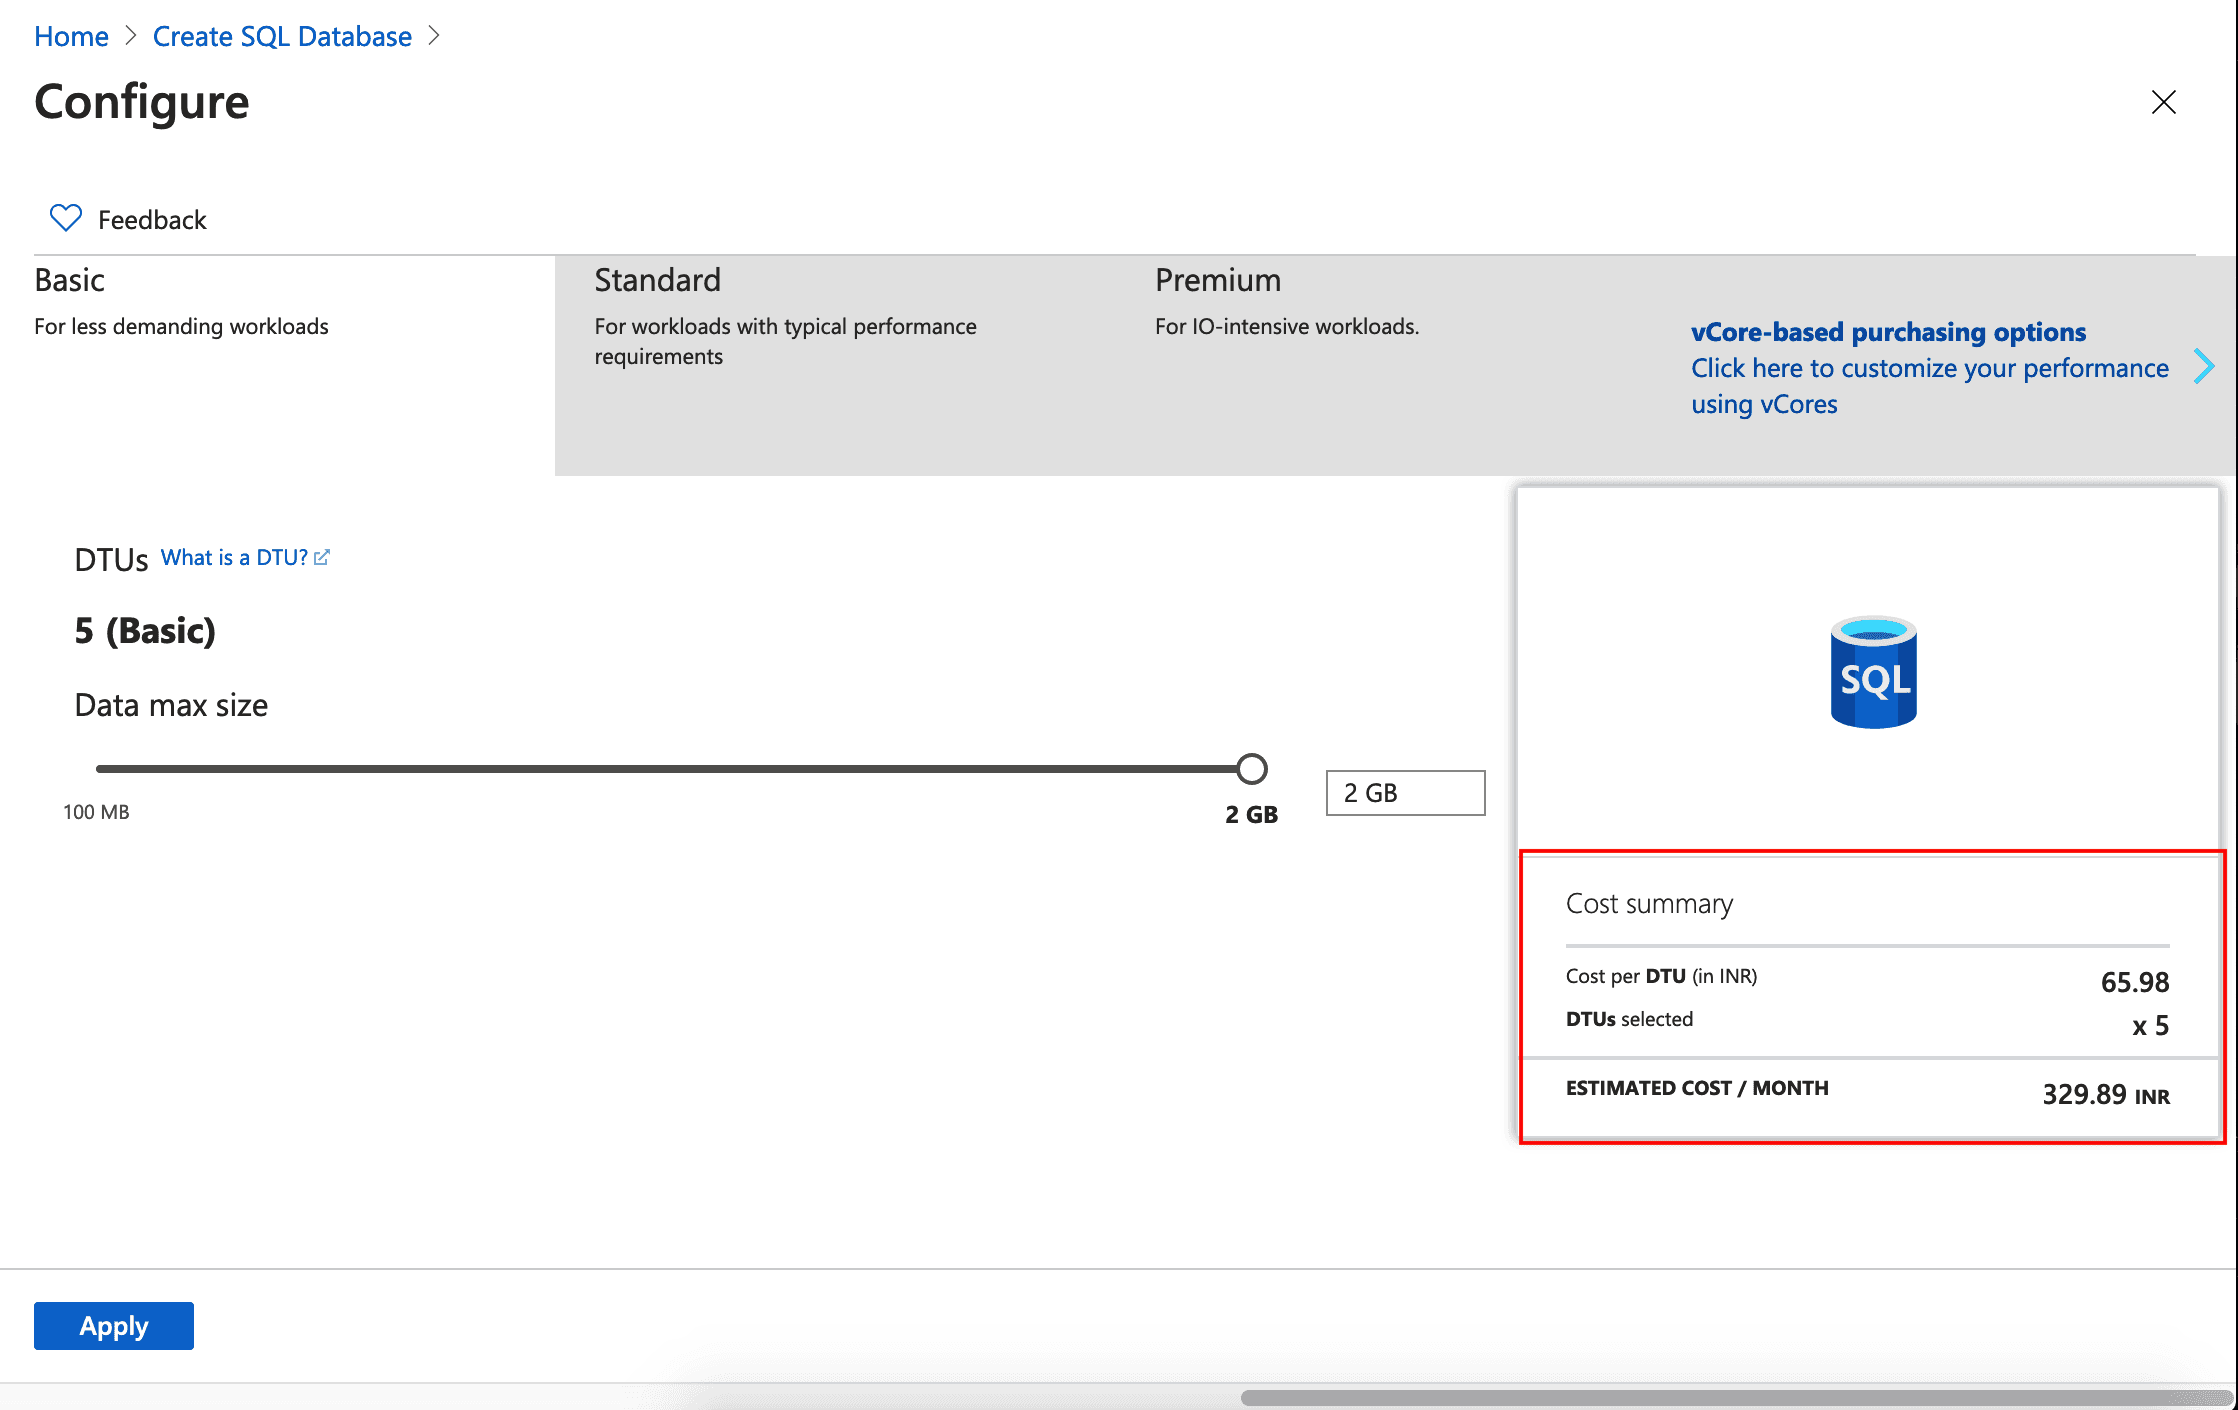
<p><a href="https://docs.microsoft.com/en-us/azure/azure-sql/database/sql-database-paas-overview">Azure SQL Database</a> runs on the stable version of Microsoft SQL Server database engine. If we follow the Microsoft Docs <a href="https://docs.microsoft.com/en-us/azure/azure-sql/database/single-database-create-quickstart?tabs=azure-portal">tutorial</a> on how to create an Azure SQL Database, there is no free tier available. The least tier is basic with approximately $5 US Dollar per month.</p>

<p><img src="/assets/images/uploads/2020-06-25-pricing.png" alt="Basic tier SQL Database Pricing" /></p>

<p>There is a little workaround here. We have to create a combo of <strong>Web App + SQL</strong> to get a free database. Then, delete the Web App (because it is not needed), after that you can use database.</p>

<h2 id="steps-to-create-free-database">Steps to create free database:</h2>

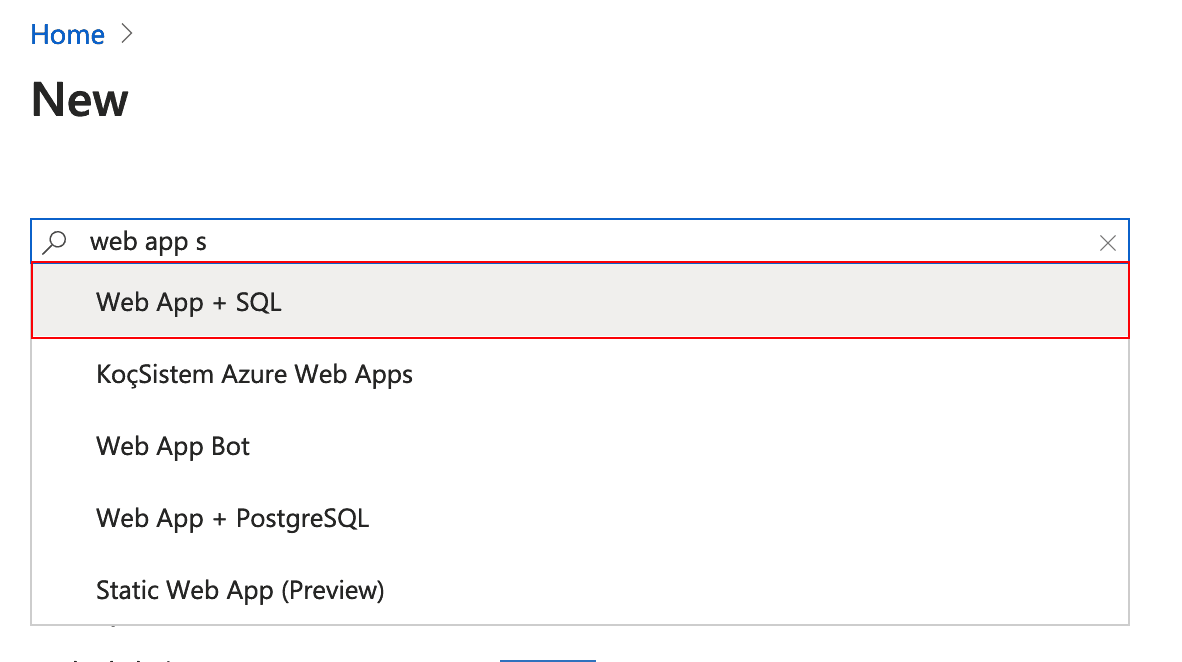
<p>Go to <a href="https://portal.azure.com/">Azure Portal</a> and click on <strong>create a resource</strong> icon. Search for <code class="highlighter-rouge">Web App + SQL</code>.</p>

<p><img src="/assets/images/uploads/2020-06-25-search-database.png" alt="Web App + SQL" /></p>

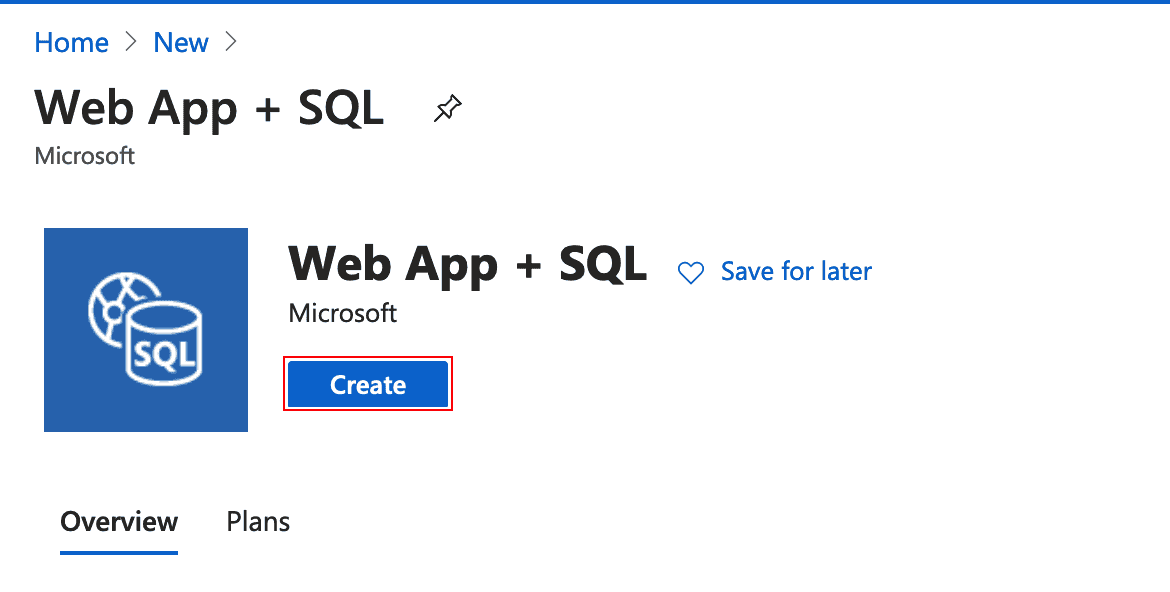
<p>Click on create button to create <strong>Web App + SQL</strong> resource.</p>

<p><a href="/assets/images/uploads/2020-06-25-create.png"><img src="/assets/images/uploads/2020-06-25-create.png" alt="create Web App + SQL" /></a></p>

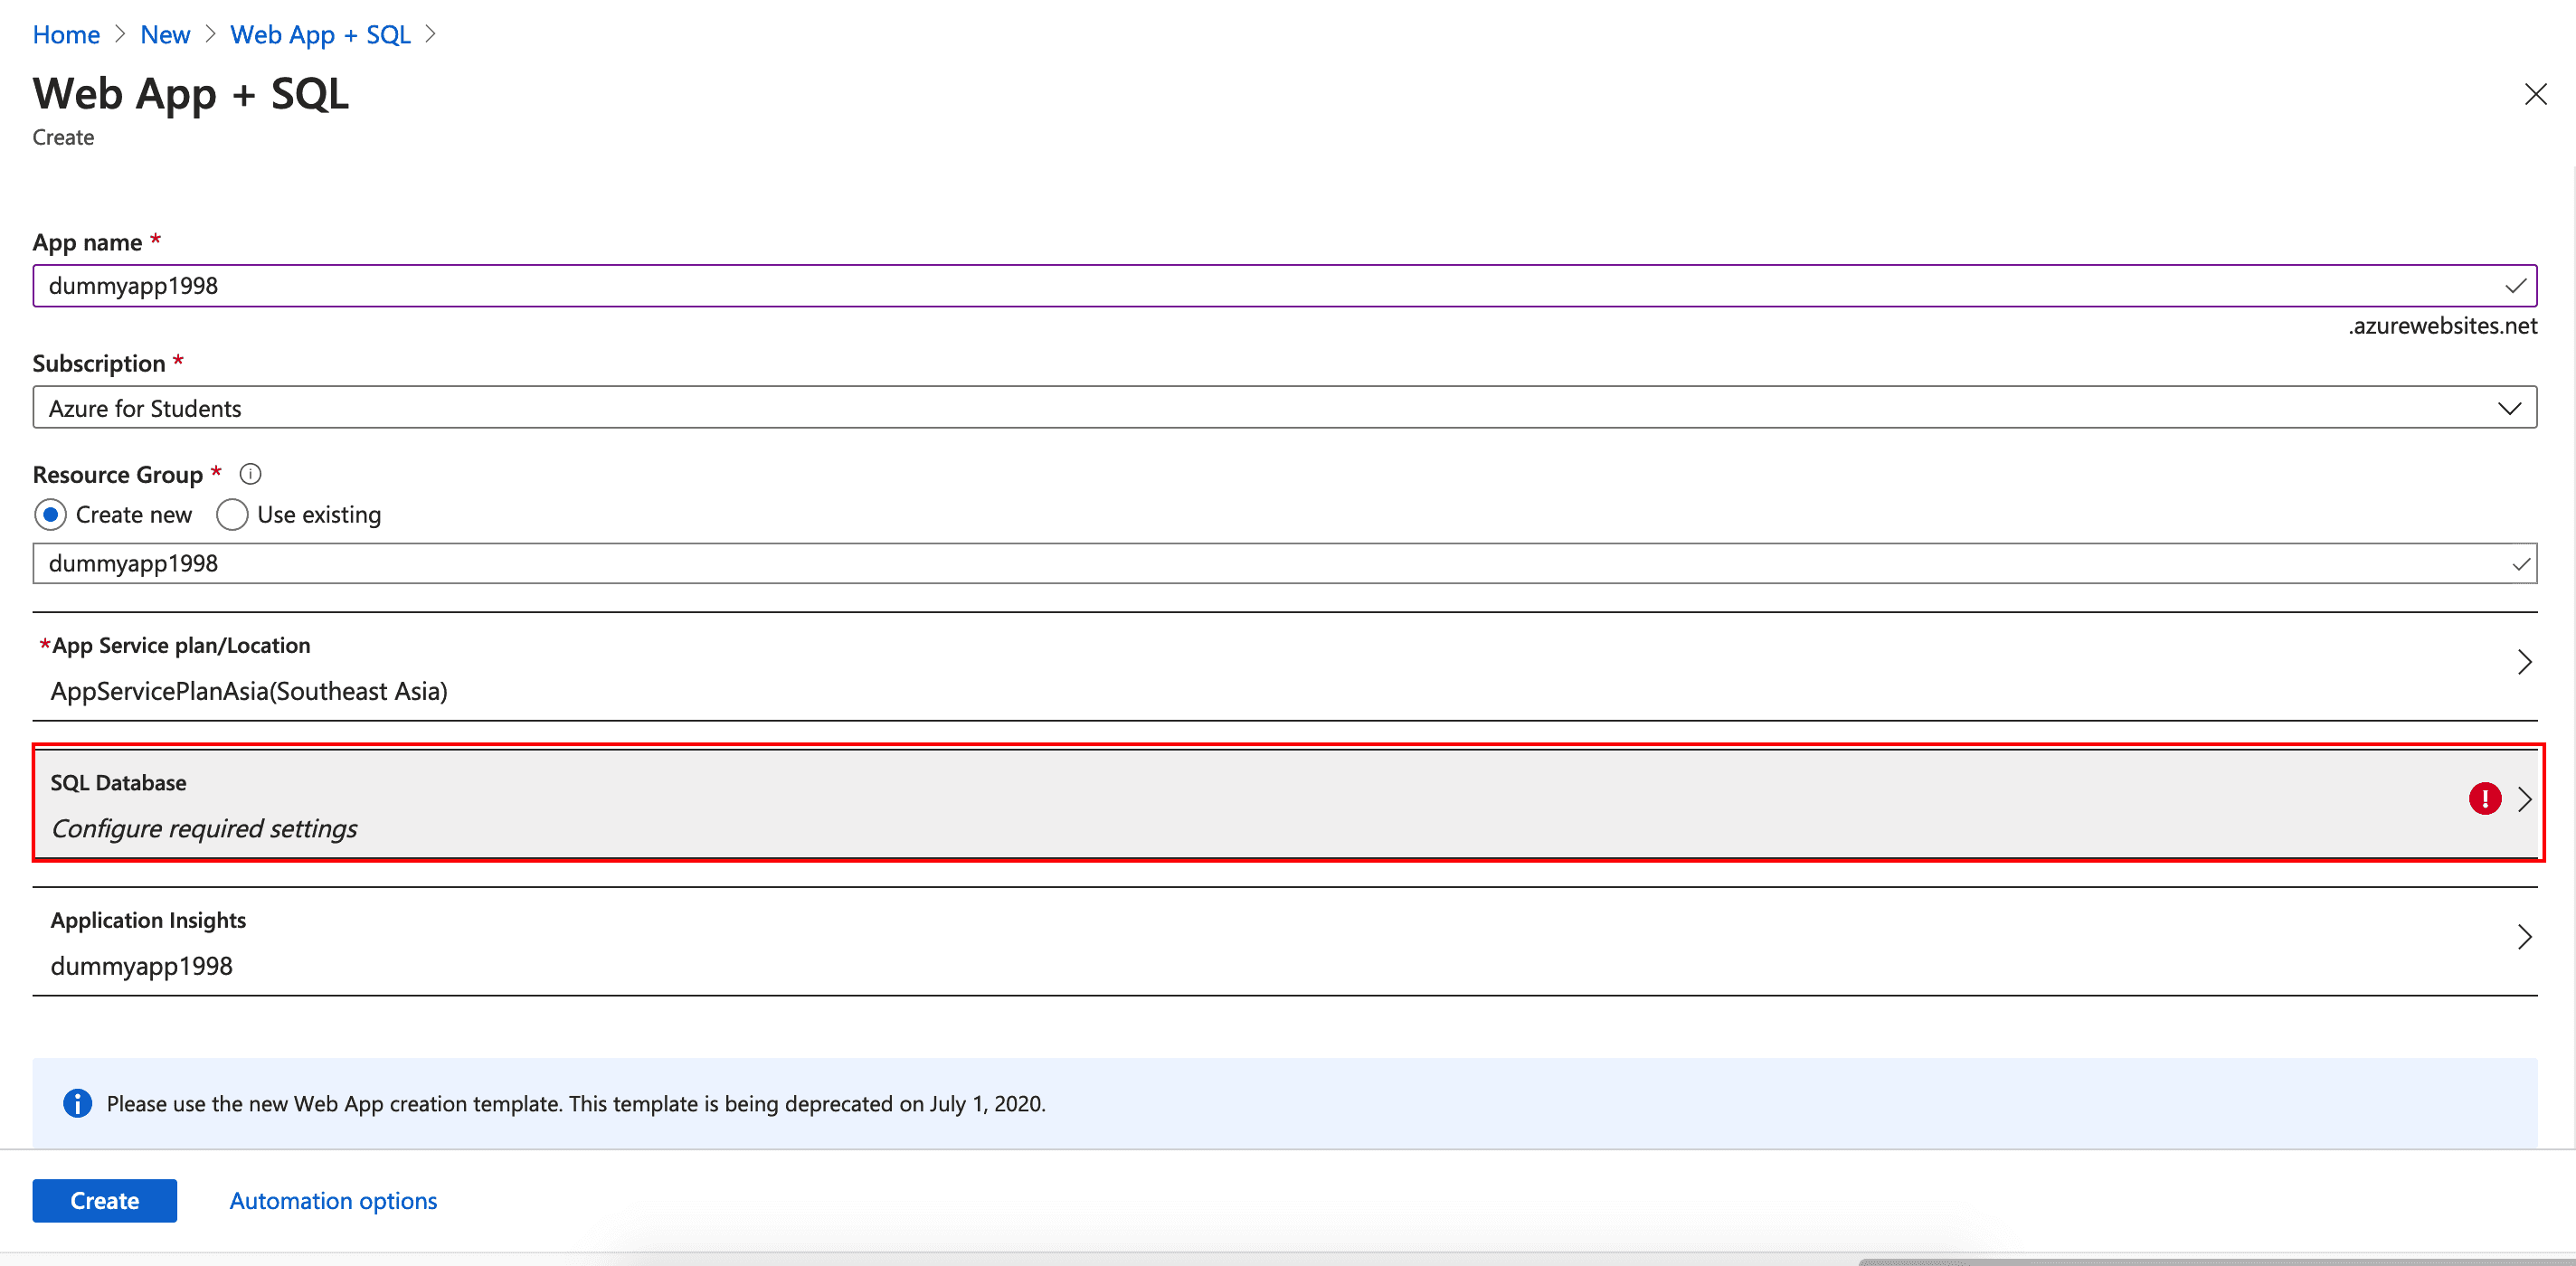
<p>In <strong>Web App + SQL create</strong> Page, fill all the data that is required.</p>

<p>If you click on <code class="highlighter-rouge">SQL Database</code> you can create a new database or select existing databases. In our case we create a new database. Before creating database configure <code class="highlighter-rouge">Target Server</code> settings for database.</p>

<p>click on <code class="highlighter-rouge">SQL Database</code></p>

<p><a href="/assets/images/uploads/2020-06-25-data-entry-database.png"><img src="/assets/images/uploads/2020-06-25-data-entry-database.png" alt="Web App + SQL data entry" /></a></p>

<p>select <code class="highlighter-rouge">create a new database</code>.</p>

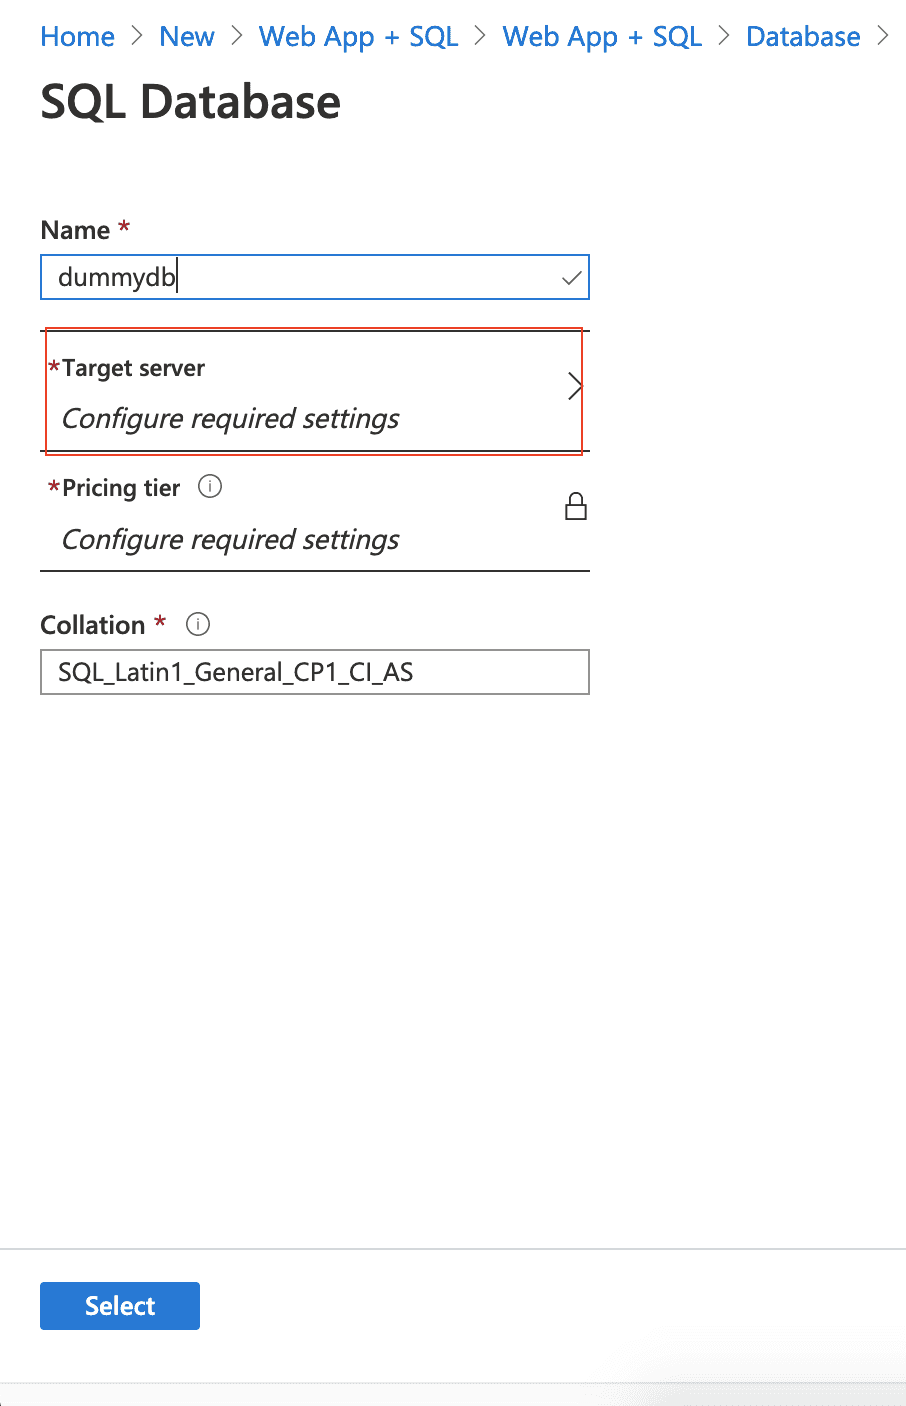
<p>Enter database name and select <code class="highlighter-rouge">Target Server</code>.</p>

<p><img src="/assets/images/uploads/2020-06-25-sql-database.png" alt="select target server" /></p>

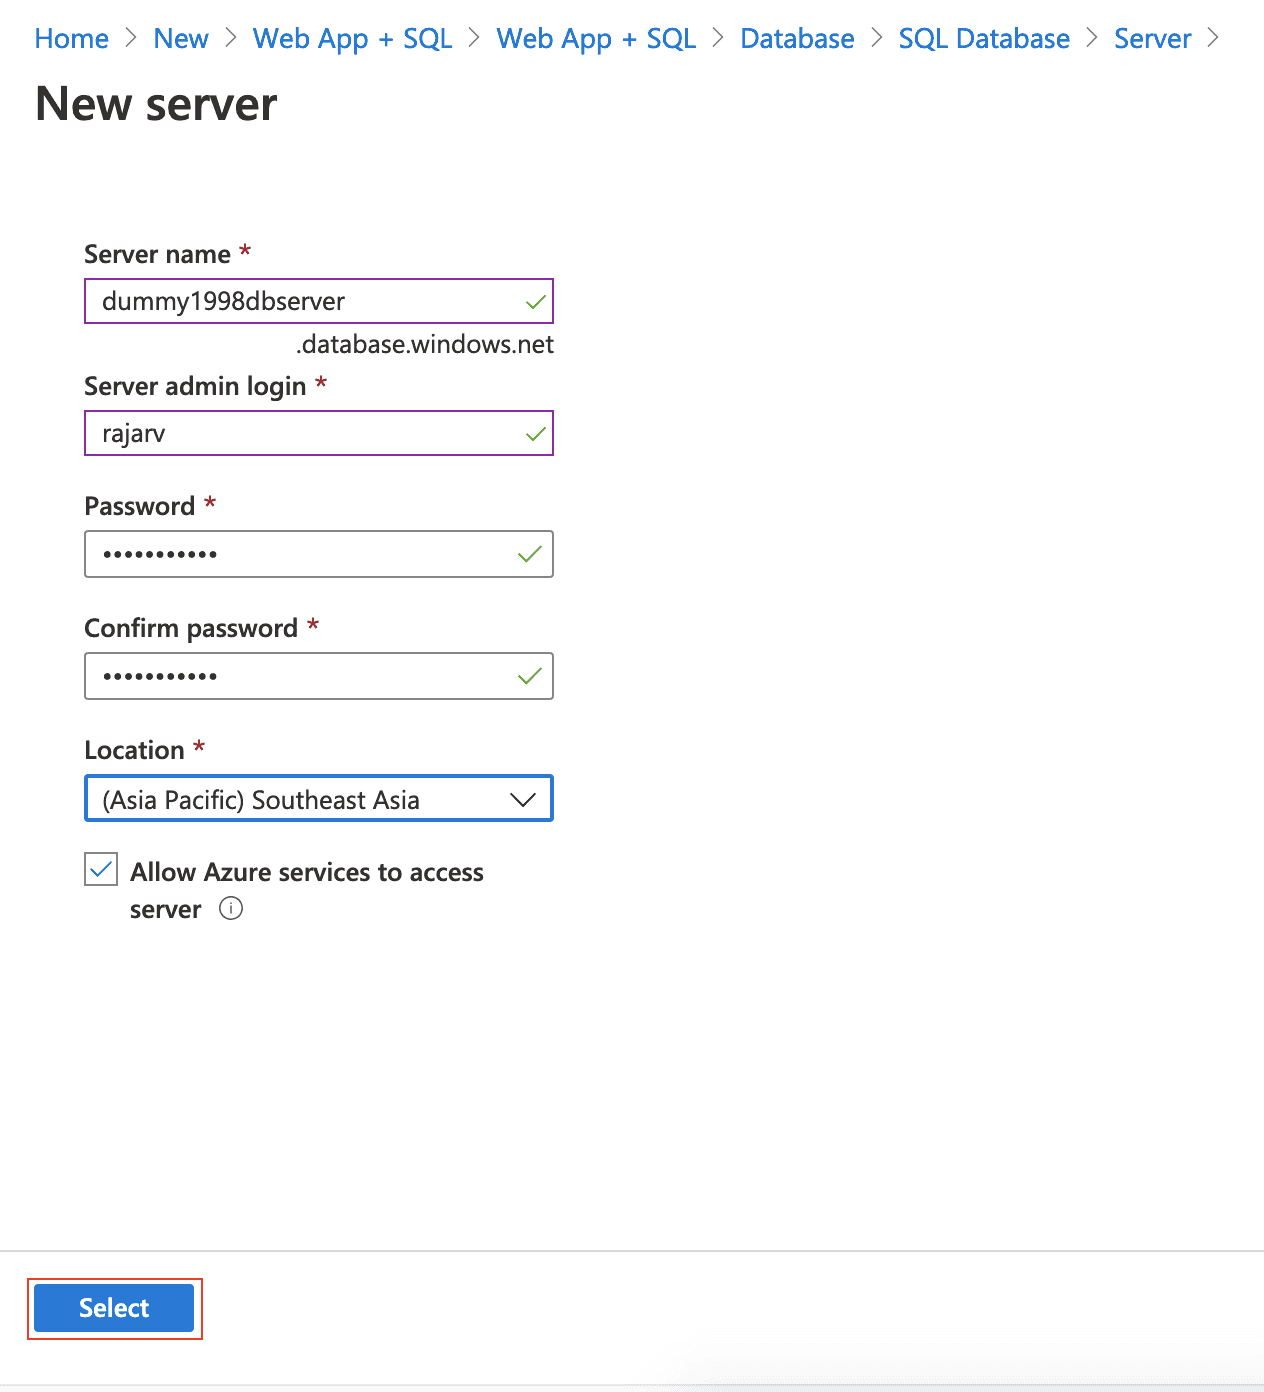
<p>Enter new server details and click select.</p>

<p><img src="/assets/images/uploads/2020-06-25-new-server.png" alt="new server details" /></p>

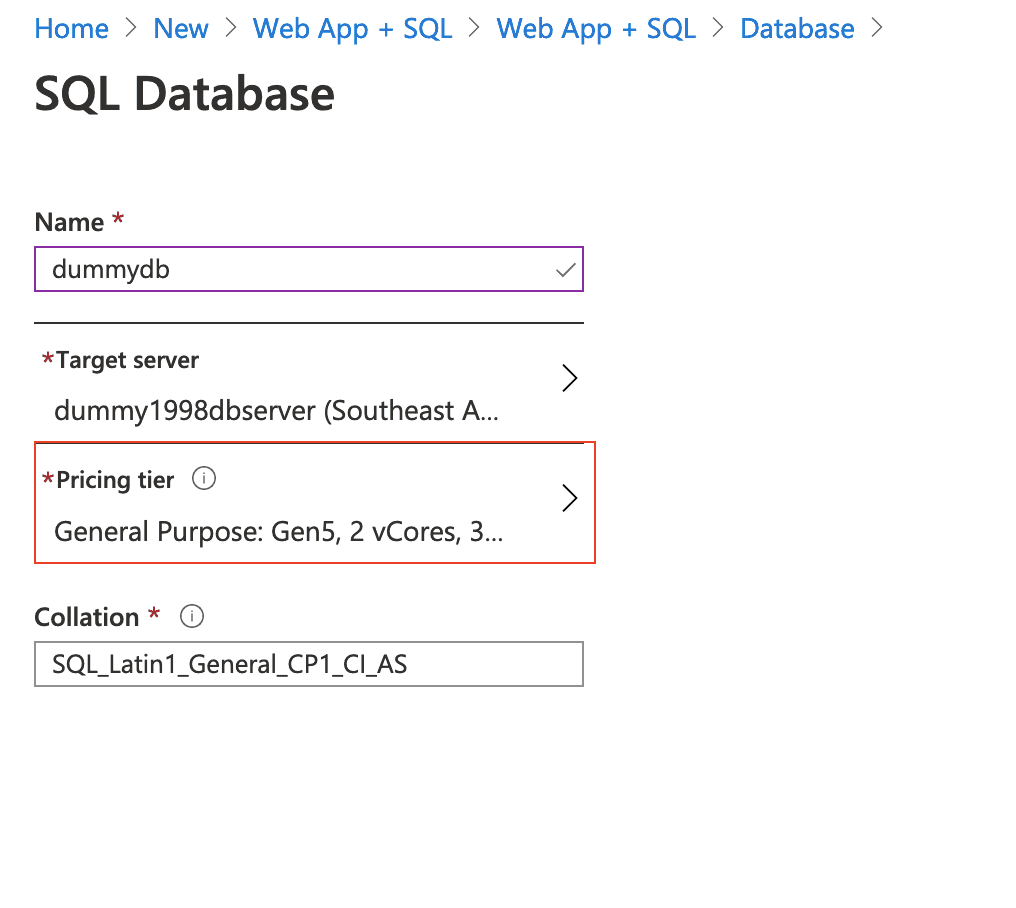
<p>Now change Pricing tier. click on Pricing tier.</p>

<p><img src="/assets/images/uploads/2020-06-25-at-11.09.57-am-compressor.png" alt="select pricing tier" /></p>

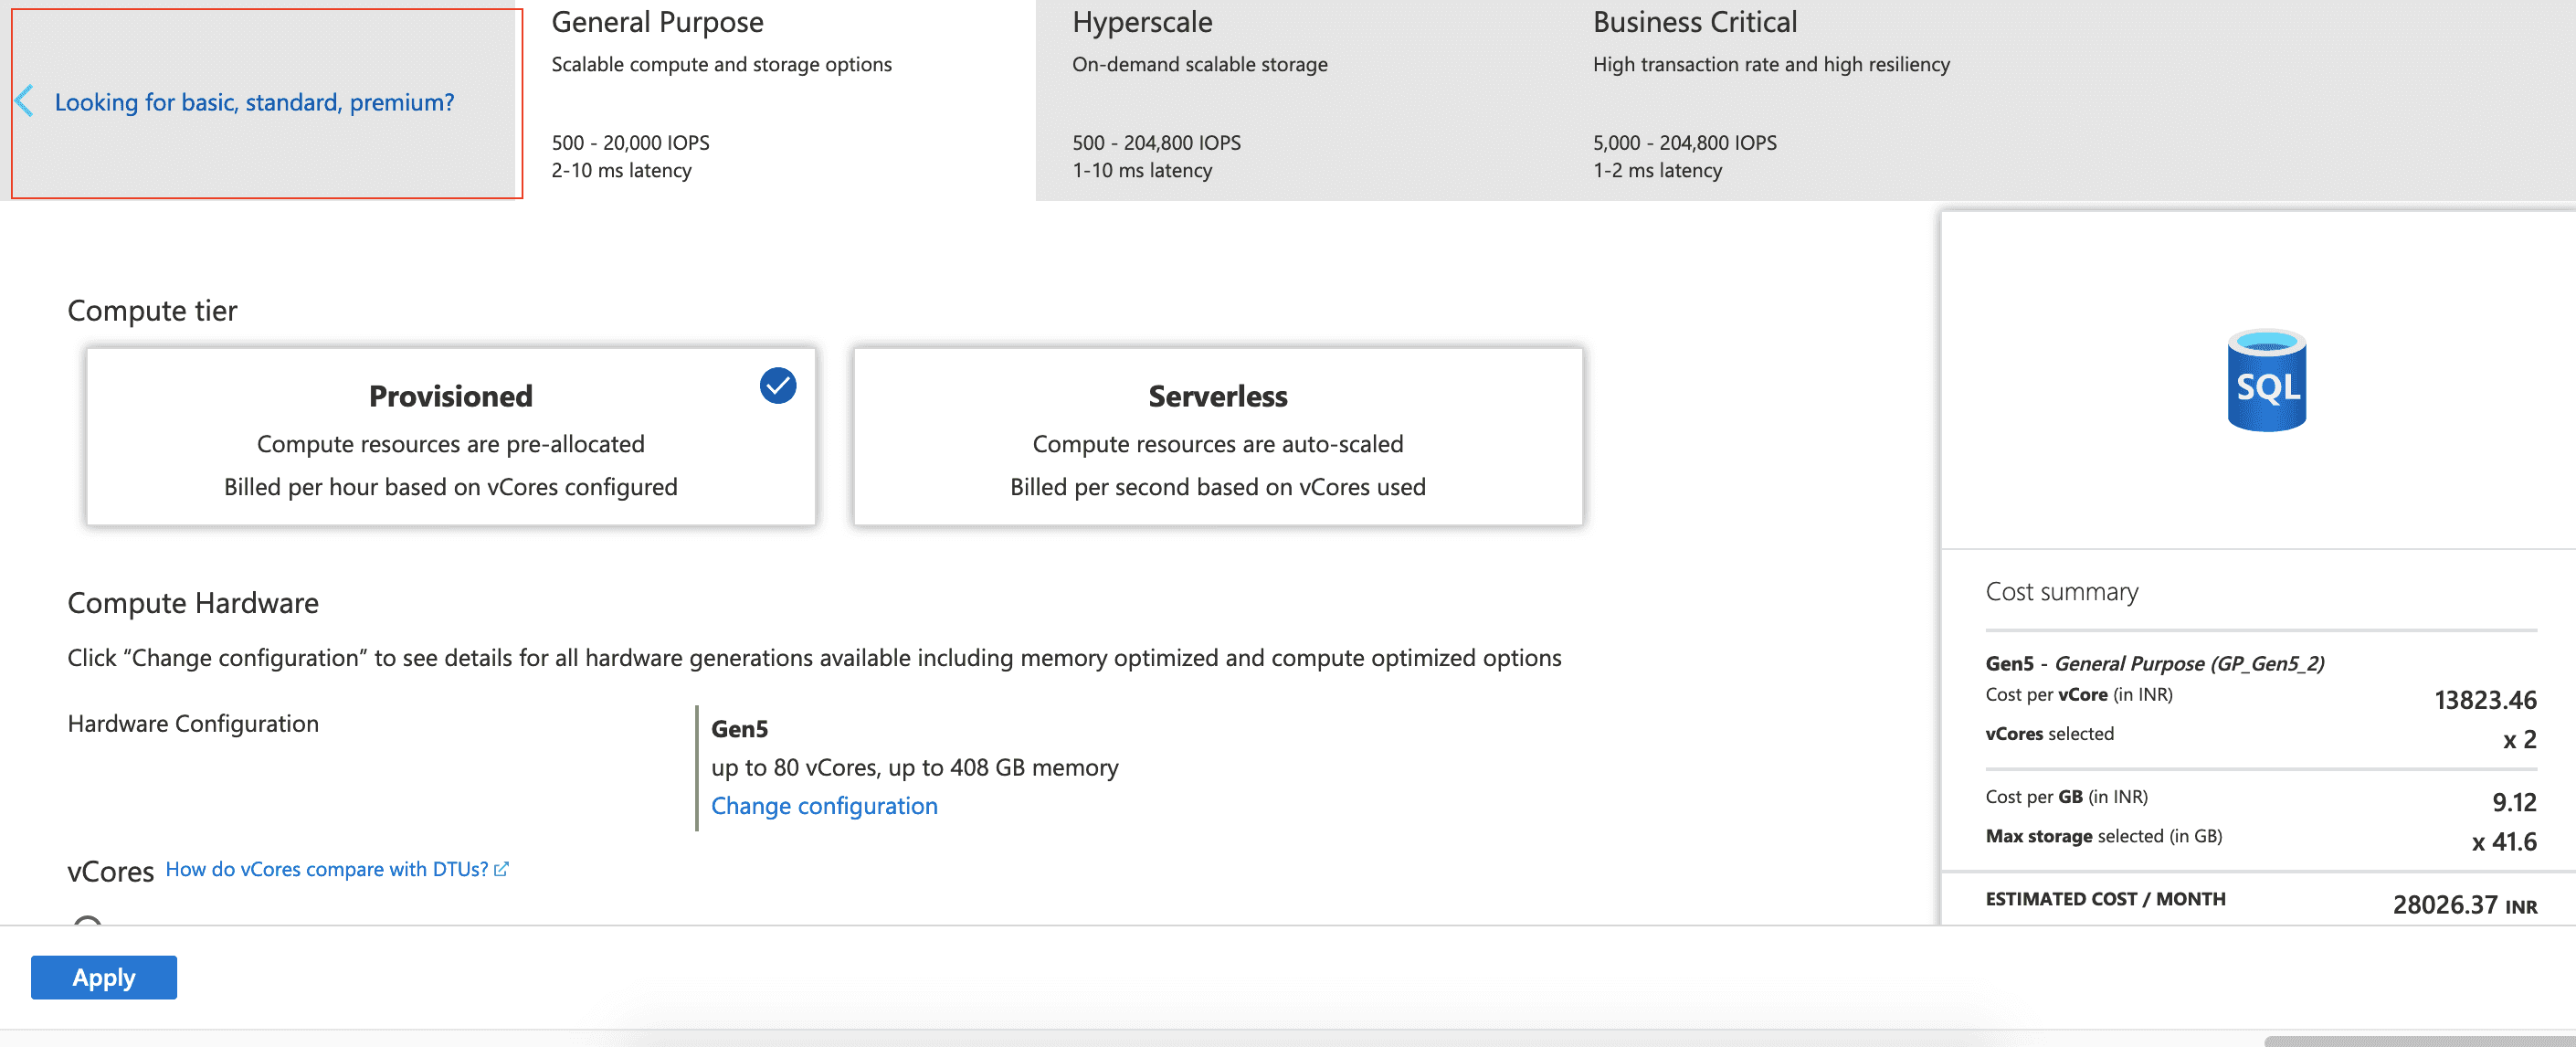
<p>click on <code class="highlighter-rouge">Looking for basic, standard, premium</code> tab.</p>

<p><img src="/assets/images/uploads/2020-06-25-at-11.10.15-am-compressor.png" alt="basic, standard, premium tab" /></p>

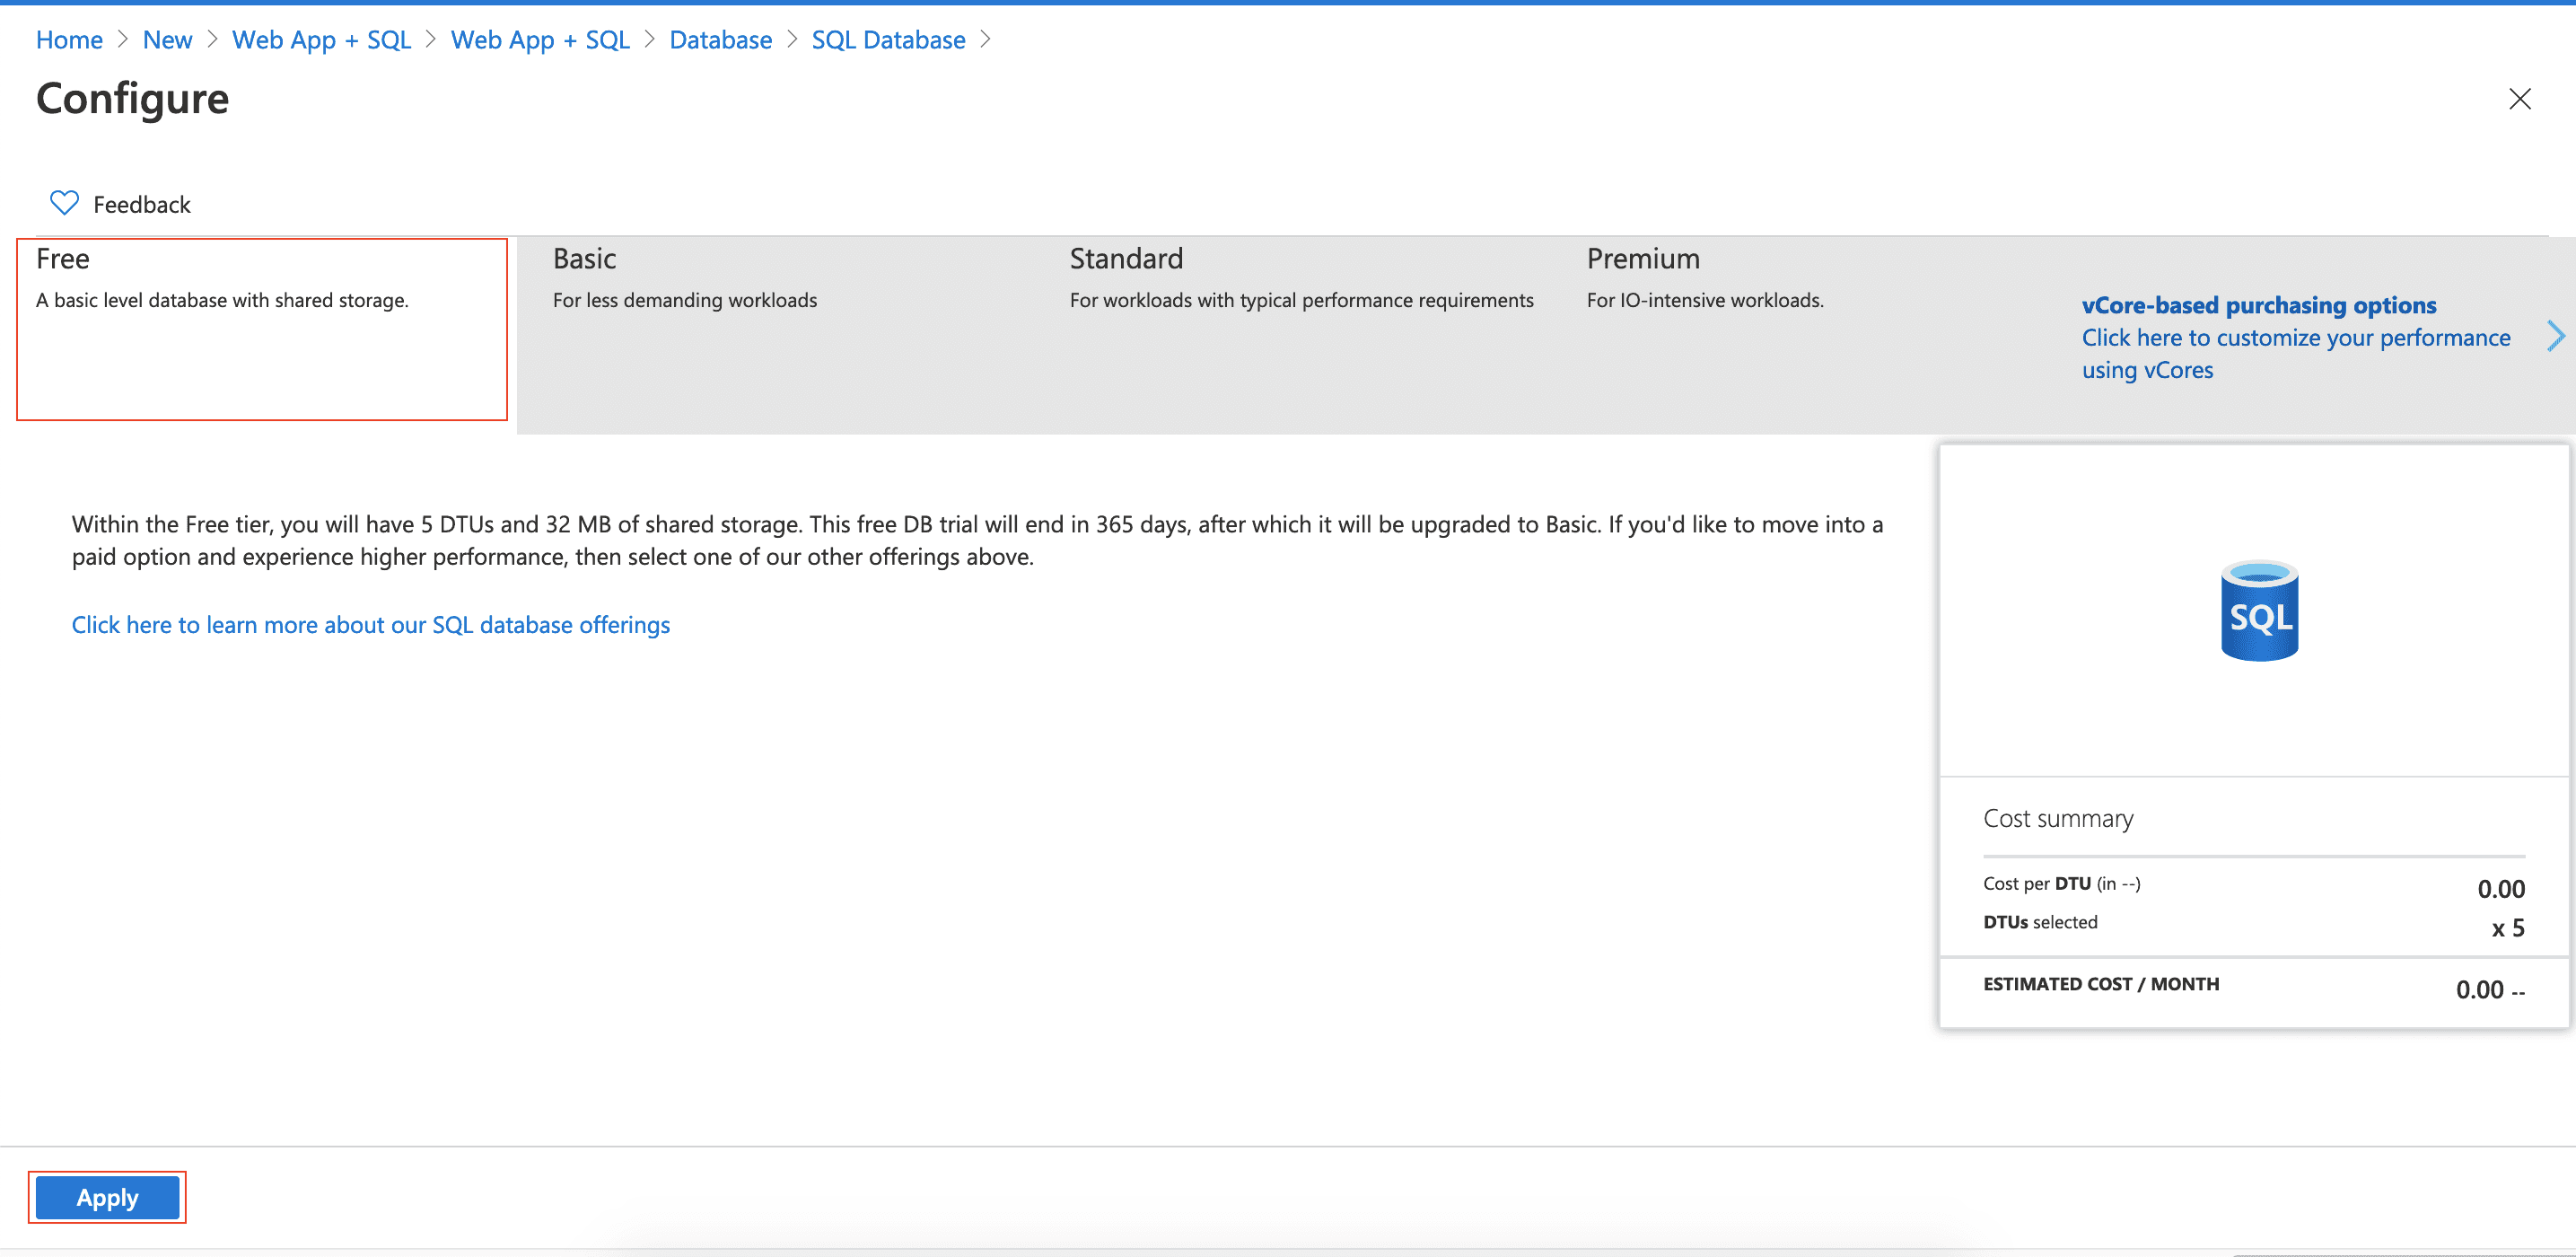
<p>click on free tab and apply.</p>

<p><img src="/assets/images/uploads/2020-06-25-at-11.10.40-am-compressor.png" alt="free tab" /></p>

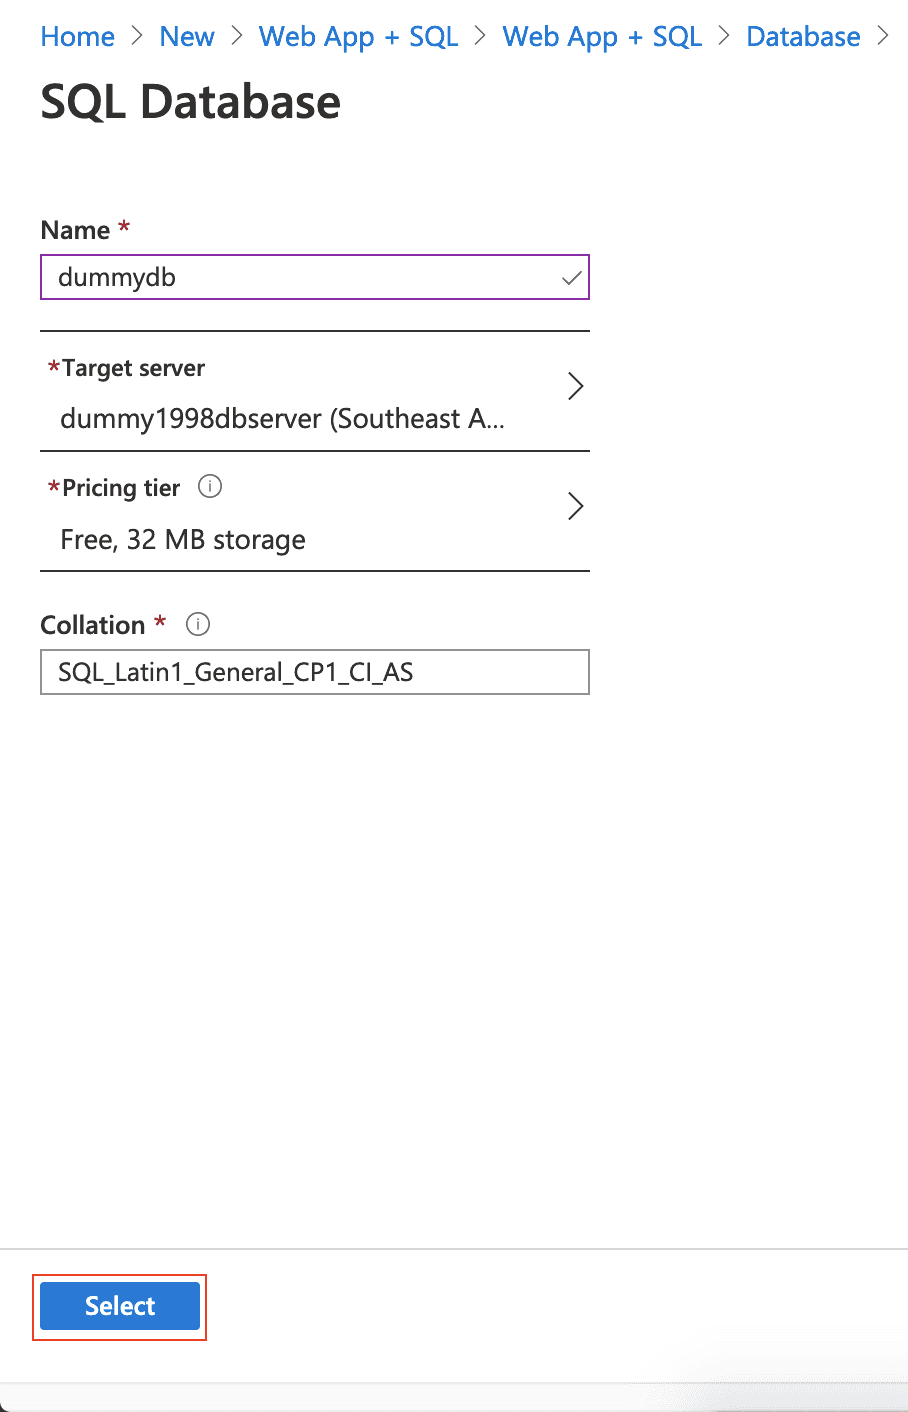
<p>Now click on apply in <code class="highlighter-rouge">SQL Database</code> page.</p>

<p><img src="/assets/images/uploads/2020-06-25-at-11.14.41-am-compressor.png" alt="SQL database" /></p>

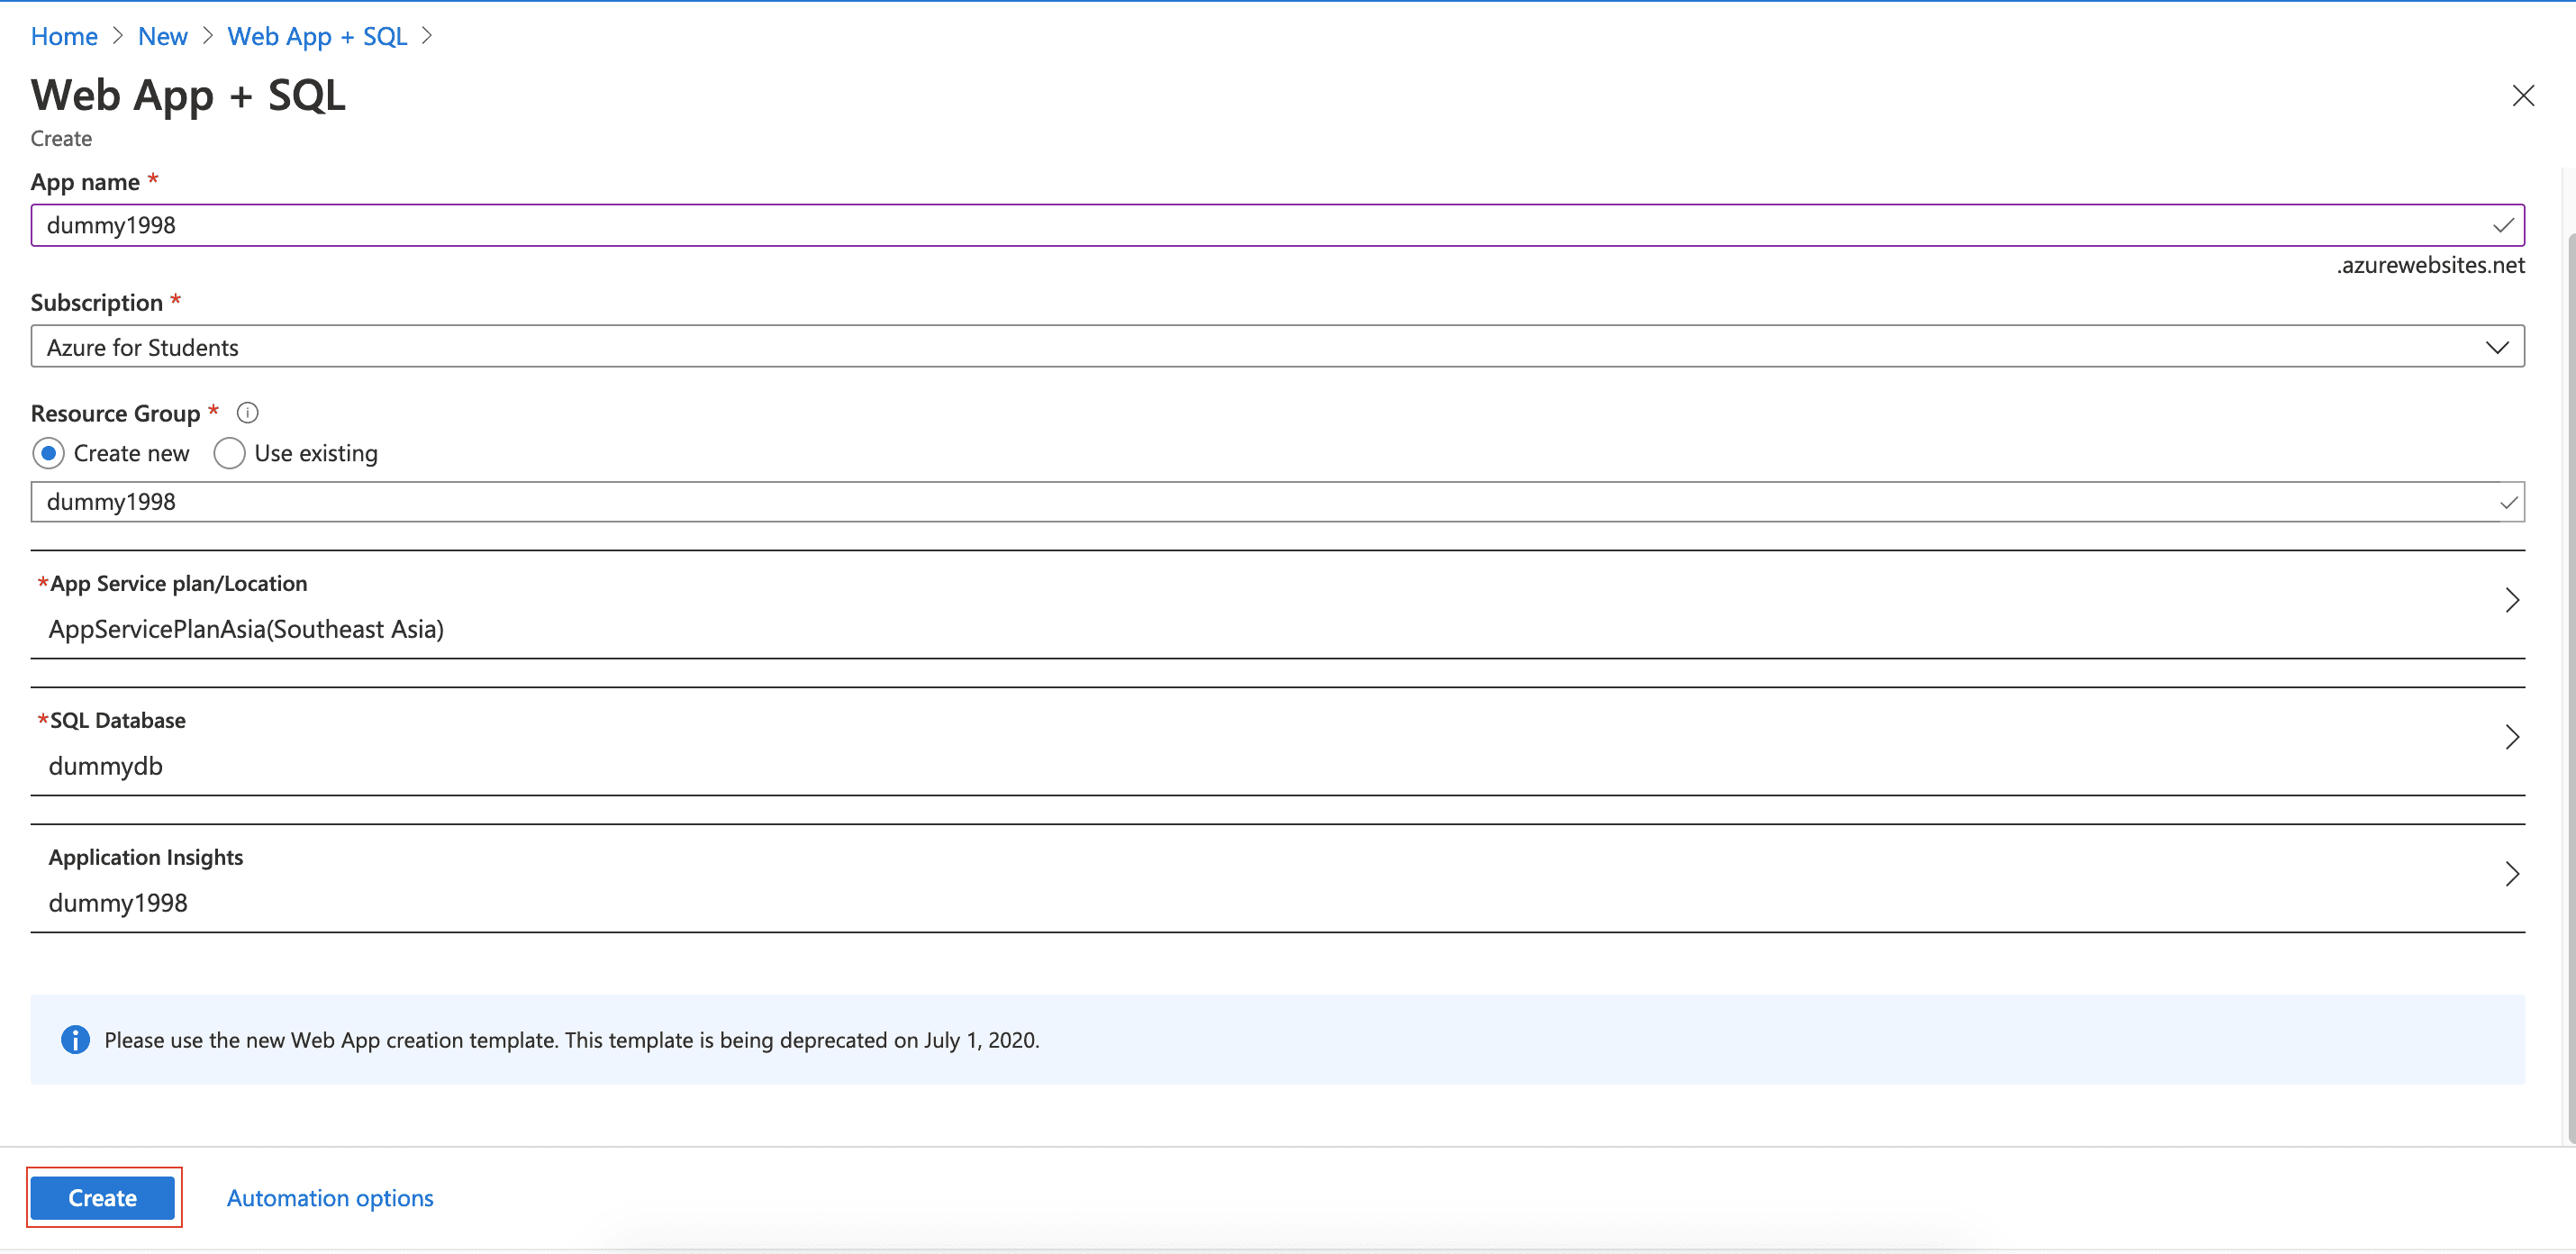
<p>Create a free App Service Plan for web app. It would be better if you create web app and database in same location. And press <code class="highlighter-rouge">Create</code> button.</p>

<p><img src="/assets/images/uploads/2020-06-25-create-webapp-sql.png" alt="create web app +SQL" /></p>

<h2 id="limitations-of-free-database">Limitations of free database</h2>

<p>The maximum size of database is <strong>32 MB of shared storage</strong> and compute is 5 <strong><a href="https://docs.microsoft.com/en-us/azure/azure-sql/database/service-tiers-dtu">Database Transaction Units (DTUs)</a>.</strong></p>

<p>This database is a trial for one year and after a year it gets upgraded to <strong>Basic</strong> tier.</p>

<p>This database is useful for learning and testing purposes only as it has low storage.</p>]]></content><author><name>Raja Vundela</name></author><category term="Azure" /><summary type="html"><![CDATA[Hi there, these steps doesn’t work anymore as Web App + SQL option was removed by Azure.]]></summary></entry><entry><title type="html">How to install and setup Python3 in macOS</title><link href="https://rajarv.com/blog/installing-python3-in-macos/" rel="alternate" type="text/html" title="How to install and setup Python3 in macOS" /><published>2020-05-28T00:00:00+00:00</published><updated>2020-06-11T11:20:20+00:00</updated><id>https://rajarv.com/blog/installing-python3-in-macos</id><content type="html" xml:base="https://rajarv.com/blog/installing-python3-in-macos/"><![CDATA[<h2 id="checking-python-installation">Checking Python Installation</h2>
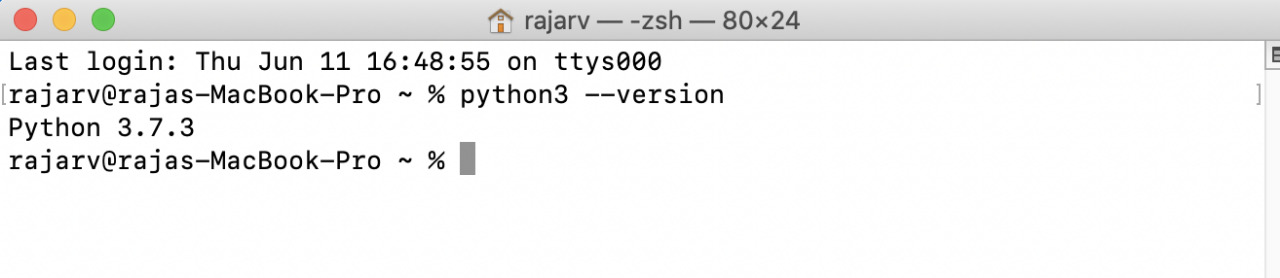
<p>Starting from macOS Catalina, Python2 &amp; Python3 is installed by default in macOS.You can check by entering <code class="highlighter-rouge">python3 --version</code> command in Terminal.</p>

<p><img src="/assets/images/uploads/2020-05-28-0.jpeg" alt="python3 version" class="align-center" /></p>

<p>Now Enter <code class="highlighter-rouge">python2 --version</code>  or <code class="highlighter-rouge">python --version</code> to check if python2 was installed. Remember entering just <code class="highlighter-rouge">python</code> defaults to python2.</p>

<p><img src="/assets/images/uploads/2020-05-28-1.jpeg" alt="python2 version" class="align-center" /></p>

<h2 id="pip"><a href="https://pip.pypa.io/en/stable/"></a>Pip</h2>

<p><a href="https://pip.pypa.io/en/stable/">Pip</a> also called as Pypi is a package manager for python. For installing new packages and to update existing packages for our projects, we need pip.</p>

<h3 id="download-pip">Download pip</h3>

<p>But there’s no pip installed by default. We have to install pip by downloading and running python file get-pip.py.</p>

<ul>
  <li>Download <a href="https://bootstrap.pypa.io/get-pip.py">get-pip.py</a> file.</li>
  <li>Go to the directory where get-pip.py file exists and execute file by entering <code class="highlighter-rouge">python3 get-pip.py</code></li>
  <li>You can check installation by entering <code class="highlighter-rouge">pip --version</code></li>
</ul>

<blockquote>
  <p>Note: Open new terminal window to check pip installation so that environment variables take in effect.</p>
</blockquote>

<h2 id="virtual-environments">Virtual Environments</h2>
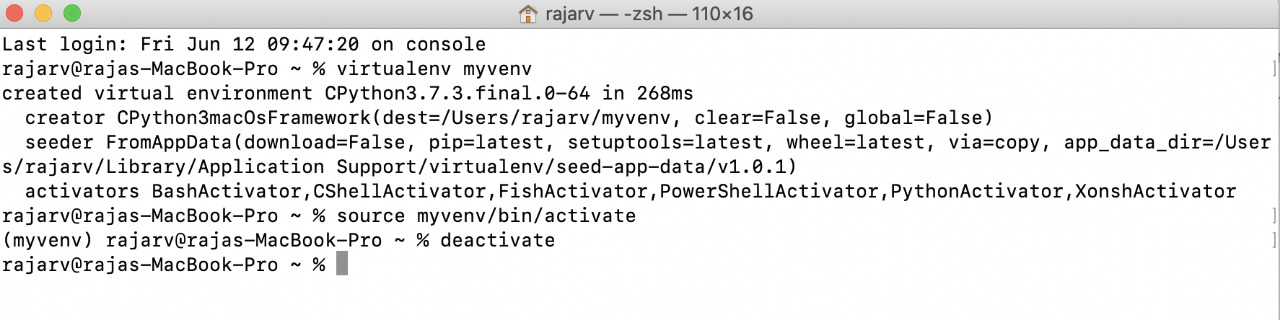
<p>Because different projects may have different python versions and packages, it is a better approach to create virtual environments for your projects to avoid dependency errors across projects.<br />
Creating a virtual environment makes less overhead in future.</p>

<h3 id="create-virtual-environment">Create Virtual Environment</h3>
<p>Install python packge <code class="highlighter-rouge">virtualenv</code> by using below command.</p>
<div class="language-shell highlighter-rouge"><div class="highlight"><pre class="highlight"><code>pip <span class="nb">install </span>virtualenv
</code></pre></div></div>
<p>To create a virtual environment you have to specify the path to the directory <code class="highlighter-rouge">virtualenv &lt;path and name of virtual environment&gt;</code><br />
To create virtual environment named ‘myvenv’ in current directory enter below command.</p>
<div class="language-shell highlighter-rouge"><div class="highlight"><pre class="highlight"><code>virtualenv myvenv
</code></pre></div></div>

<h3 id="activate-virtual-environment">Activate Virtual Environment</h3>
<p>To activate virtual environment on mac/linux enter</p>
<div class="language-shell highlighter-rouge"><div class="highlight"><pre class="highlight"><code><span class="nb">source </span>myvenv/bin/activate
</code></pre></div></div>
<p>for windows enter</p>
<div class="highlighter-rouge"><div class="highlight"><pre class="highlight"><code>myvenv\Scripts\activate
</code></pre></div></div>
<p>You can see the name of virtual environment preceeding in your terminal.</p>

<h3 id="deactivate-virtual-environment">Deactivate Virtual Environment</h3>
<p>For getting out of virtual environment to use your actual environment type ‘deactivate’.</p>
<div class="language-shell highlighter-rouge"><div class="highlight"><pre class="highlight"><code>deactivate
</code></pre></div></div>
<p><img src="/assets/images/uploads/2020-05-28-2.jpeg" alt="python virtual environment" class="align-center" /></p>

<p>Happy Coding!</p>]]></content><author><name>Raja Vundela</name></author><category term="Python3" /><summary type="html"><![CDATA[Checking Python Installation Starting from macOS Catalina, Python2 &amp; Python3 is installed by default in macOS.You can check by entering python3 --version command in Terminal.]]></summary></entry></feed>